

Patient Fields
Custom patient fields are fields that can be added to various areas of the program.
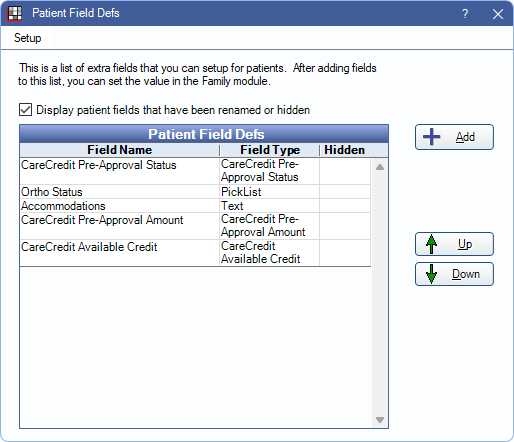
In the Main Menu, click Setup, Family/Insurance, Patient Field Defs.
Custom Patient Fields can show in several areas including:
- Patient Information area of the Family Module.
- Patient information area of the Account Module.
- Patient Information area of the Chart Module.
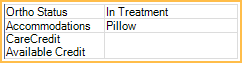
- Patient Fields area of Ortho Chart.
- Appointment Views.
Use the Up and Down arrows to reorder Patient Field Defs. Click Add to create a new field.
Display patient fields that have been renamed or hidden:
- Checked: When a Field Def is in use by a patient, renaming or marking the field as hidden, causes the old field and any entered data to show in gray text at the bottom of the Patient Information area.
- Unchecked: When a Field Def is in use by a patient, renaming or marking the field as hidden causes entered data to be hidden from the Patient Information area.
Edit Patient Field Def
Click Add or double-click an existing field to edit. The available options in the window depend of the selected Field Type
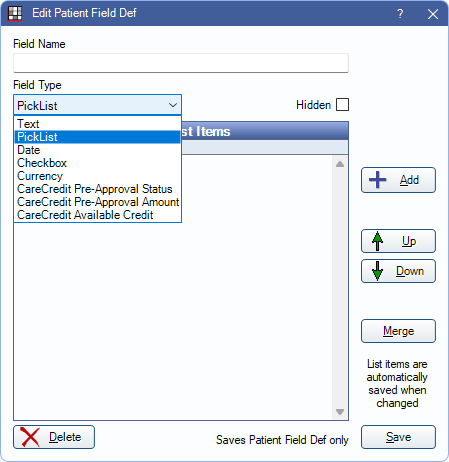
Field Name: Enter the field label.
- Data entered in a patient field is tied to the field name. If editing a patient field name, any data already entered in the field is hidden, and essentially a new field is created. To view data tied to the original field name, revert to the original name, or create a new field with the same name
Field Type: Select the type of field to determine how data is entered.
- Text: Users can enter any freeform text.
- PickList: Users select from a list of items. Once an item is selected for a patient, it appears as plan text. Displays additional options.
- Date: Only allow users to enter dates. These dates are attached to patients as plain text rather than as a formal date.
- Checkbox: Create a single checkbox that users can use to indicate yes or true.
- Currency: Only numeric values are allowed. Values are converted to currency (e.g., 1 is converted to $1.00).
- CareCredit Pre-Approval Status: For CareCredit users, this field updates automatically based on Quickscreen results with the patient's approval status. The available statuses are Pre-Approved, Unable to Pre-Approve - Refer Patient to Credit Application, and Cardholder.
- This field is added by default. Users who do not have the CareCredit integration enabled can hide this field.
- Once in use, this field cannot be renamed.
- CareCredit Pre-Approval Amount: For CareCredit users, this field updates automatically based on the individual Lookup or Quickscreen results with the patient's pre-approval amount. If this field is entered, CareCredit Available Credit is marked as N/A.
- This field is added by default. Users who do not have the CareCredit integration enabled can hide this field.
- Once in use, this field cannot be renamed.
- CareCredit Available Credit: For CareCredit users, this field updates automatically based on an individual Lookup or Quickscreen results with the patient's available credit amount. Only displays an amount if the patient is already a CareCredit cardholder. If this field is entered, CareCredit Pre-Approval Amount is marked as N/A.
- This field is added by default. Users who do not have the CareCredit integration enabled can hide this field.
- Once in use, this field cannot be renamed.
Up / Down: Only available for PickList Field Type. Highlight an item and click to update the order of the item in the Pick List Items area.
Add: Only available for PickList Field Type. Click to create a new item in the Pick List Items area. Opens Patient Field Pick Item. 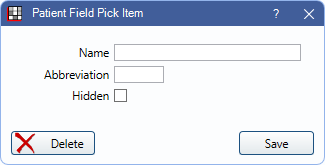
- Name: Description for the Pick List Item. This is what is generally displayed for the patient when the item is selected in a Patient Field.
- Abbreviation: Enter a shortened description of the item. Displayed in the Family Module, Super Family grid.
- Delete: Remove the item.
- Click Save to close the window and keep changes.
This window also opens when double-clicking an item in the Pick List Items area. Existing items can be edited.
Merge: Only available for PickList Field Type. Highlight items in the Pick List Items area and click to merge selected items. This cannot be undone. Once merged
- The item name is updated to include both selected items (e.g., Item 1/Item 2).
- The abbreviation from the item closest to the top of the list of used.
- If selected items are in use for a patient, the patient field is updated to reflect the new merged item.
Hidden: Patient field defs in use cannot be deleted. Check to hide them instead.
Click Save to close the window and keep changes.
Field Display

On the Patient Field Defs window, click Setup to open the Field Display window and determine where Patient Fields are shown.
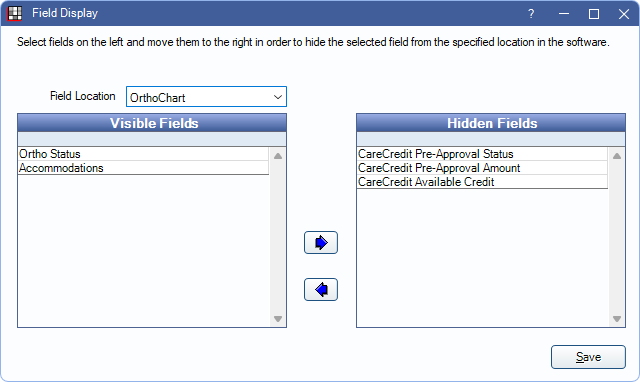
All Patient Fields Defs can displayed in all patient information areas (Chart, Account, Family, Ortho Chart), or only certain fields can be displayed in individual areas.
Field Location: Click the dropdown to select the location. Options include:
- Account: Fields available for the Display Field category AccountPatientInformation.
- AppointmentEdit: Fields available in the Edit Appointment window. Uses Appointment Field Defs.
- Chart: Fields available for the Display Field category ChartPatientInformation.
- Family: Fields available for the Display Field category PatientInformation.
- OrthoChart: Fields that display in the Patient Fields area of the Ortho Chart.
- GroupNote: Fields available in a Group Note. (Orion users only)
Visible vs Hidden Fields: Determine which fields should be visible and which should be hidden. To move a field to a different grid, highlight it, then click the right/left arrow.
- Visible Fields: Fields that show in the Ortho Chart, or when PatFields is added to the corresponding Display Field category.
- Hidden Fields: Fields that do not show.
For AppointmentEdit, only fields that are not in use or fields in use (i.e., a value has been entered into the field) but not added to an Appointment View can be hidden. Fields in use and added to an appointment view cannot be hidden, and there is a warning when attempting to hide these fields.
Click Save to close the window and keep changes.
- To view Patient Fields in module Patient Information areas, they must be set up in Display Fields. Add PatFields to the Patient Information (Family Module), Account Patient Information, or Chart Patient Information categories to display Patient Field defs in the corresponding module.
- The Patient Fields area is always displayed in the Ortho Chart.
- Individual Patient Field Defs can be added to the SuperFamily Grid Columns Display Fields category.
Using Patient Fields
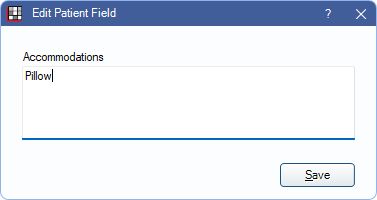
To enter data into a patient field, double-click the field where displayed (e.g., Family Module).
Patient Fields displayed in SuperFamily Grid Columns are read only. Edit data from another area.
Options vary depending on the Field Type and setup.
Auto Note: This button is only available for Text Field Types in the Ortho Chart. Click to enter an Auto Notes.
Click Save after selecting or entering informating to close the window and keep changes.