

Accounting
Open Dental has a built-in accounting tool that can be used independently by small offices.
In the Manage Module, click Accounting.
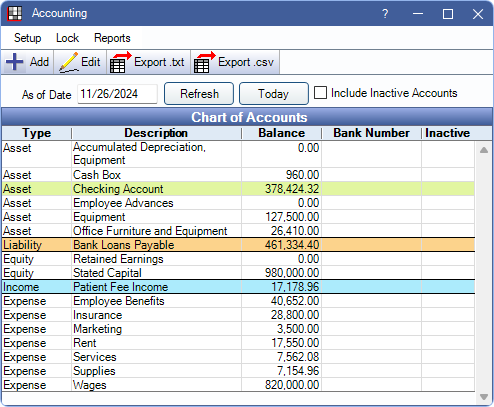
The Chart of Accounts is a list of the accounts used to organize finances and divide expenses, revenue, assets, liabilities, and equity. When set up correctly, certain transactions in Open Dental automatically create accounting transactions in the Chart of Accounts.
Menu Items
Setup: Set up automated deposit entries and automated payment entries.
- Open Dental: See Accounting Setup
- QuickBooks: See QuickBooks
- QuickBooks Online: See QuickBooks Online
Lock: Lock all accounting entries on or before a specific date (e.g., when closing out the year). See Accounting Close Year.
Reports: Generate and print end-of-year Accounting Reports.
Accounting Options
Add: Add a new account.
Edit: Select an account, then click to make make changes. See Edit Account below.
Export .txt: Save the Chart of Accounts grid as a tab-delimited text file.
Export .csv Save the Chart of Accounts grid as a comma-delimited CSV file.
Close: Close the Accounting window.
Filters & Grid
As of Date: Change to view balances on a different day and click Refresh.
Today: Click to refresh the list to show current balances.
Include Inactive Accounts: Include or exclude accounts marked as inactive.
- Check: Shows inactive accounts and their balances as of the date selected.
- Uncheck: Hides inactive accounts and their balances. Unchecked by default.
Chart of Accounts: A list of existing account types and their balance as of today's date.
To add, edit, or view, Accounting Transactions, double-click an account.
Edit Account
To add a new account, click Add. To make changes to an existing account, select the account and click Edit.

Description: Enter the account name.
Type: Select the kind of account. There are five types of accounts:
- Asset accounts: e.g., practice checking account, equipment, cash box.
- Liability accounts: Loans.
- Equity accounts: Owner/Practice Contributions/Capital, Retained Earnings, etc.
- Only one account can be marked as Retained Earnings, and the account cannot be deleted. If there are duplicate accounts named "Retained Earnings" they should be marked inactive or deleted.
- Income accounts: For accounts receivable (e.g., sources of revenue such as patient or insurance payments)
- Expense accounts: For accounts payable (e.g., expenses such as supplies, utility bills, employee benefits, etc.)
Bank Number: The bank account number to represent this account in the Chart of Accounts grid. Used typically only for Asset account types.
Inactive: Mark this account inactive to hide it from the Chart of Accounts grid.
Row Color: Set a color to make the row easier to spot in the Chart of Accounts grid. Click on the color box to select a color.
Delete: Removes the account. Accounts with transactions cannot be deleted.
Click Save to keep changes.
Troubleshooting
For additional troubleshooting, also see Accounting FAQ.
If accounts for automatic payments are set up incorrectly, transactions may be attached to invalid accounts and errors may occur when trying to view old payments. Follow these steps to identify and fix the transactions.
- Update to the latest stable version.
- In the Main Menu, click Tools, Database Maintenance.
- Click Fix.
- A message in the log indicates how many transactions have an invalid account: "Transactions found attached to an invalid account: X. All invalid transactions have been attached to the account called UNKNOWN. They need to be fixed manually."
- In the Manage Module, click Accounting. A new account called UNKNOWN shows. Double-click on it to view all transactions attached to an invalid account.
- For each transaction correct the account.
- Double-click on the transaction.
- Uncheck Simple.
- In the Splits area, double-click on the Unknown account.
- Click Change and select the correct account.
- Click Save to keep the changes and close the window.