

Public Health Custom Screening
Practices utilizing Public Health can complete screenings using custom sheets.
In the Main Menu, click Tools, Public Health Screening.
These steps explain how to use a custom public health screening form.
- In Preferences, check Screening Use Sheets to use the custom form. To customize the sheet, see Screening Layout.
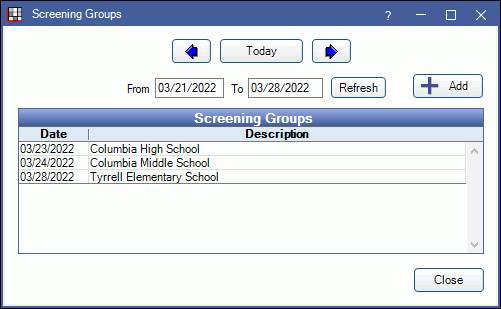
- Before patients can be screened, set up screening groups and add patients.
Double-click the screening group to select it. Screening groups are grouped by date. If needed, change the date and click Refresh.
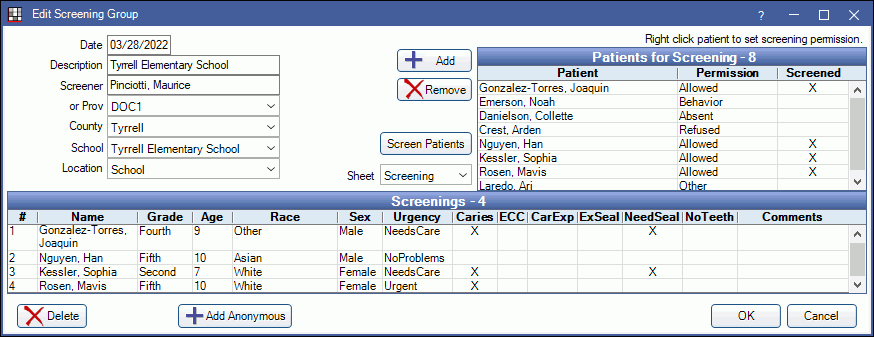
Patients should already list under Patients for Screening.
- Only patients with Allowed permission will be screened. Change permissions by right clicking on a patient.
- To change patient information, double-click a patient to open the Edit Patient Information.
- To add patients, see Public Health Screening.
- Anonymous screenings do not require adding a patient or setting screening permissions. See Anonymous Screenings at the bottom of this page.
If needed, click the Sheet dropdown to select the screening form to use. The default is the internal screening sheet. Once you select a form, it is saved with the screening group.
Click Screen Patients. The screening form for the first patient with an Allowed permission, who hasn't been screened yet, will open.
Enter screening information. See below for a description of common form elements.
Click OK to save. A new row will show in the Screenings list for this patient and a Screening Form will list in the patient's Chart Module, Progress Notes.
If there are more patients to screen, a new custom form will open for the next patient who has an Allowed permission and hasn't been screened.
- To exit screenings, click Cancel on the screening form. To resume, click Screen Patients again.
- If you delete a screening for a patient, their permission level returns to 'unknown'.
Elements in a custom screening form
The options below show in the internal screening form. If you have customized a custom screening form, your options may vary.
Pale yellow fields indicate areas where you can type new or changed information. Names, birthdate, age, and preferred name will be pre-filled if the information is entered on the Edit Patient Information window.
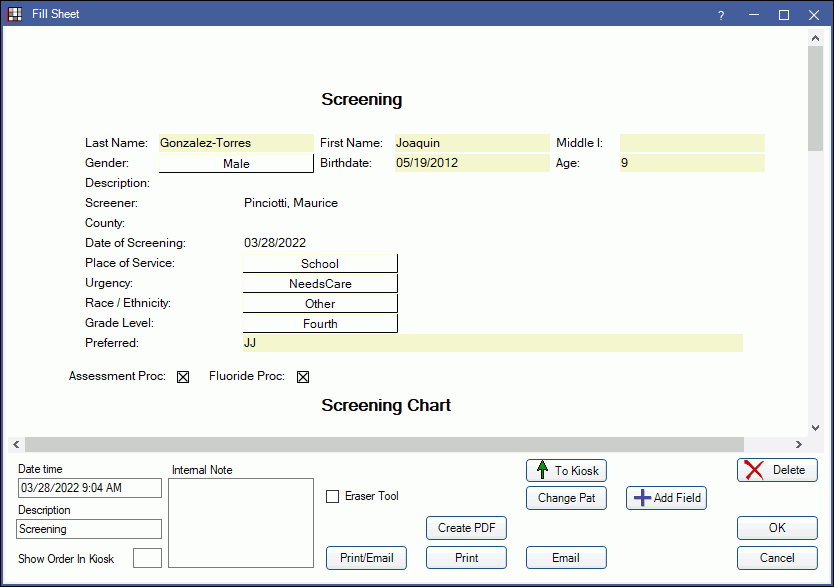
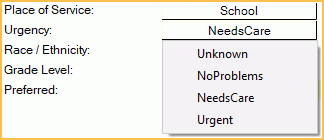
Combo boxes: These are pick lists from which you can select from a list of options. Click the combo box, then click an option. Gender, place of service, urgency, and grade level will be pre-filled if the information is entered on the Edit Patient Information window.
Checkboxes: Checking the following boxes automatically adds a corresponding completed procedure code to the patient's chart. Additional checkboxes can be added to a custom screening sheet. If using clinics, the clinic selected in the Main Menu is automatically associated with the procedures charted.
- Assessment Proc: Adds procedure code D0191 (assessment of a patient).
- Fluoride Proc: Adds procedure code D1206 (topical application of fluoride varnish).

Tooth Charts: Tooth charts can be used to mark tooth status. Primary or permanent teeth is set when customizing the screening form. There are two chart options:
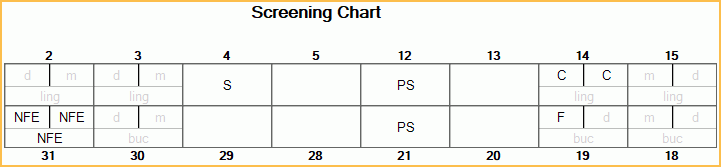
- Screening Chart: Mark current tooth status including treatment needed.
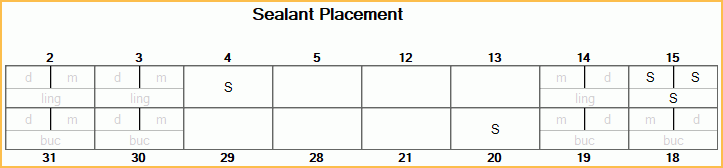
- Sealant Placement: Mark completed sealant procedures.
Click on a tooth or surface in the chart then select a code to mark it. Teeth 2, 3, 14, 15, 31, 30, 19, and 18 allow a code per surface. You can mark a single surface or all. A legend of the codes shows under the Screening Chart.
- S = Seal
- PS = Previously Sealed/Intact
- C = Caries
- F = Filled
- NFE = Not Fully Erupted
- NN = Not Needed
- None = remove a previously marked code.
Sealant Procedures on Permanent Teeth: If S is marked on a tooth or surface, a corresponding procedure (D1351) is also automatically added to the patient's chart. If marked on the Screening Chart, the sealant procedure will have a TP status. If marked on the Sealant Placement chart, the sealant procedure will have a C status (complete). Surface information will be associated with the procedure, but not sent with claims. Sealants are the only code that will insert a procedure in the chart. All other codes are informational only but are reportable in custom queries.

Screening Chart Example: S indicates teeth or surfaces where a sealant is treatment planned. C indicates caries. NFE indicates a tooth not yet erupted. For each permanent tooth with a S code, a corresponding sealant procedure will be added to the patient's chart with a treatment planned status.
Sealant Placement Example: Each S indicates where a sealant procedure was completed. For each permanent tooth with a S code, a corresponding sealant procedure will be added to the patient's chart with a completed status.
Add anonymous screenings
Anonymous screenings do not require adding a patient or setting screening permissions.
- Click Add Anonymous.
- Enter the information. All information except Name can be entered.
- Click OK. A new screening form will open.
- When finished entering all anonymous screenings, click Cancel to close the screening form.
If the person needs treatment, consider entering them into the system as a regular patient (if not already entered) and putting their patient ID number in the Comments section.