

PayConnect Void
PayConnect payments can be voided, rather than returned, if the payment was made in a certain time window.
In the Payment Window, click PayConnect.
Voiding PayConnect credit card sales or returns removes the original transaction from the patient's bank account the same day.
After processing a void, it is recommed to run the Income Transfer Manager to ensure the void is properly allocated.
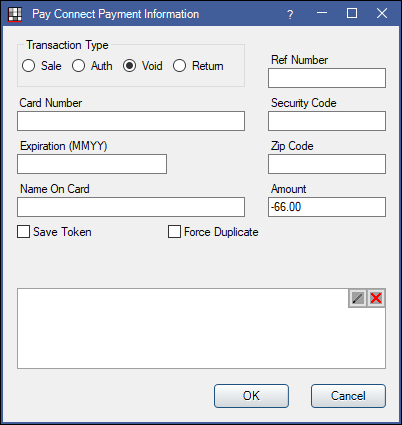
Void a PayConnect 1.0 Transaction
If using PayConnect 1.0, the interface shown at the top of this page appears when processing a void.
When using PayConnect 1.0, transactions can only be voided within 30 minutes of the original transaction.
If the transaction is older than 25 minutes or has been deposited, process a Credit Card Return instead. Returns require a few days to process.
- Locate the original transaction to be voided. Copy the Ref Number from the Payment Note, then identify the payment amount and the clinic, provider, and allocation.
- In the patient's account, click Payment.
- Alternatively, if voiding a payment, right-click the original payment, select Refund, and go to Step 5.
- Enter an amount matching the original transaction.
- If voiding a payment, enter the amount as negative (e.g., -25).
- If voiding a refund, enter the amount as a positive (e.g., 25).
- Click OK to open the Payment window.
- If using Clinics, select the clinic of the original payment.
- Allocate Payment Splits to the production (i.e., procedures, adjustments, or unearned income types) of the original payment. See Paysplit Revise.
- After verifying the paysplits, click PayConnect.
- If using right-click, Refund, paysplits are added automatically to match the original payment. See Refund for more details.
- In the PayConnect Payment window, select Void and enter the Ref Number, Card Number, Expiration Date, and Security code of the original transaction.
- Click OK to process. The payment window closes immediately and the transaction details are automatically added to the Payment Note.
Void a PayConnect 2.0 Transaction
If using PayConnect 2.0, the interface shown below appears when processing a void.
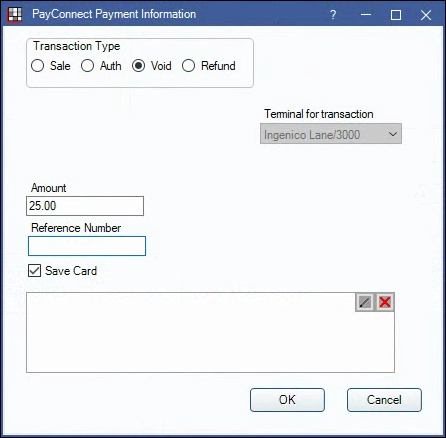
When using PayConnect 2.0, transactions can be voided until the batch closes at the end of the day. This may differ depending on what the office has set up with PayConnect. If the batch has closed or there is an error when attempting the void, process a return instead.
- Locate the original transaction to be voided. Copy the Reference Number from the Payment Note, then identify the payment amount and the Clinic, provider, and allocation.
- In the patient's account, click Payment.
- Alternatively, right-click the original payment, click Refund, and go to Step 5.
- Enter an amount matching the original transaction. If voiding a payment, enter the amount as negative (e.g., -25). If voiding a refund, enter the amount as a positive (e.g., 25).
- Click OK to open the payment window.
- If using Clinics, select the clinic of the original payment.
- Allocate Payment Splits to the production (i.e., procedures, adjustments, or unearned income types) of the original payment.
- After verifying the paysplits, click PayConnect.
- If using right-click, Refund, paysplits are added automatically to match the original payment.
- In the PayConnect Payment window, select Void and enter the Reference Number.
- Click OK to process.
- The payment window closes immediately and the transaction details are automatically added to the Payment Note.
- The applicable surcharge amount from the orginal payment is also voided. The total voided by PayConnect is noted in the transaction details in the payment Note as Amount.