

Mobile Web eRx
In Mobile Web Home, press eRx.

- Providers and proxy (non provider) clinicians can begin using DoseSpot to send ePrescriptions after DoseSpot Setup is complete.
- When proxy (non-provider) users select the eRx button, they will need to select the provider they are creating the prescription for from the list. Providers who are scheduled for today will show. If the provider is not scheduled, they can use the "show all" box to see a full list of providers.
- Proxy users can only create pending prescriptions. A registered provider must complete the sending process.
For details on using DoseSpot on desktop, see DoseSpot eRx / Prescription.
Begin by searching for the patient. Press their name in the results list to open the DoseSpot Home Screen.
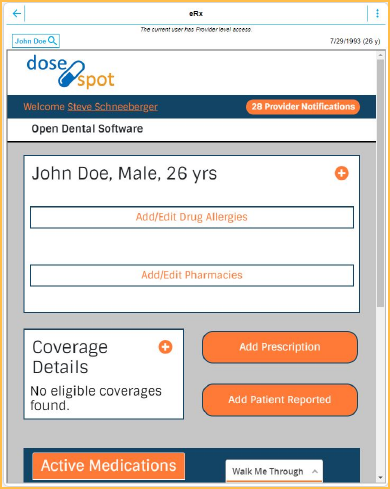
At any time press Walk Me Through for a guided tutorial of using DoseSpot.
Add Allergies
- In the Patient Details dashboard, press Add/Edit Drug Allergies. Allergy information already entered for the selected patient shows here.
- Check No Known Allergies if the patient has no allergies.
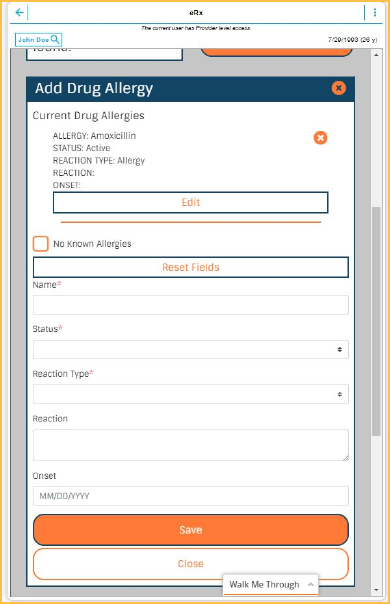
- Fill in the information.
- Name: Begin typing the drug name and a list will appear. Select the correct drug from the list.
- Status: Select Active or Inactive. The default is Active.
- Reaction Type: Select Allergy or Adverse Reaction.
- Reaction: Enter the reaction the patient gets from the drug.
- Onset: The date of the first occurrence of the allergy.
- Press Save.
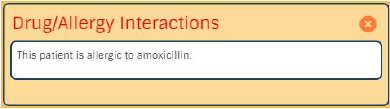
Prescribing a drug the patient is allergic to results in a warning in the Patient Details dashboard.
Add Existing Medications
DoseSpot supports two-way medication syncing. Medications added to DoseSpot automatically list in Open Dental, and medications added in Open Dental automatically list in DoseSpot. Self-reported medications can be edited from both Open Dental and DoseSpot.
By default, all medications added in Open Dental import to DoseSpot as Patient Reported.
- In the Patient Details dashboard, press Add Patient Reported.
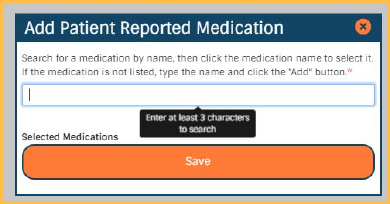
- In the Search field, begin typing the medication name and it will appear. Select the correct medication from the list. If the medication does not appear, manually enter it and press Add.
- The medication will appear in Medications to Add.
- Press Save.
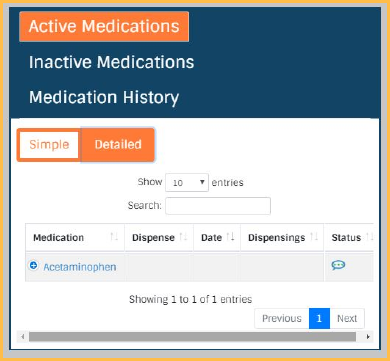
Patient reported medications will appear in Medications in Open Dental and in the Patient's Active Medications area as a comment icon in DoseSpot.
Add a Preferred Pharmacy
You must add a pharmacy to the patient before medications can be sent electronically. Preferred pharmacies list under Add/Edit Pharmacies in the Patient Details dashboard.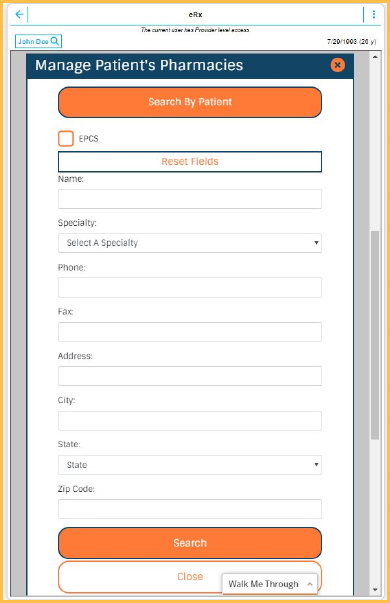
- In Patient's Preferred Pharmacies, press Add/Edit Pharmacies.
- Use Specialty dropdown to filter the pharmacy list, and enter the pharmacy info in the provided fields. Check the box for EPCS for EPCS pharmacies.
- Press Search.Note: Try using fewer search criteria if you have trouble finding the correct pharmacy.
- Press the preferred pharmacy from the results list to add it to the patient.
- To remove a pharmacy, press Add/Edit Pharmacies and select the 'x' next to Pharmacy Name.
Prescribe and Send New Medications
Prescribing New Medications
- In the Patient Details dashboard, Press Add Prescription.
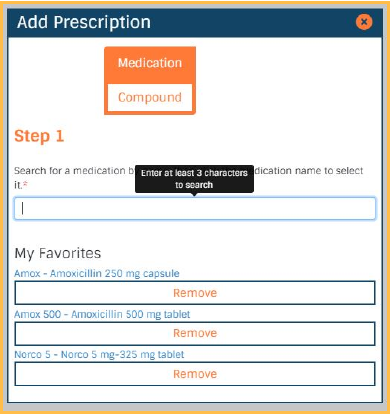
- In the Search field, begin typing the medication name and it will appear. Select the correct medication from the list.
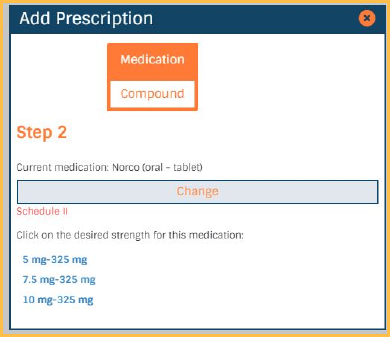
- Select the dosage amount listed under the medication.
- Fill out the following fields:
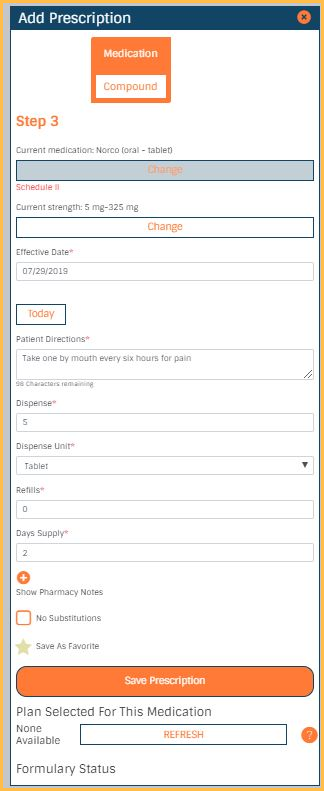
- Effective Date: This is a required field for controlled substances, and must be within six months of the day the prescription is written.
- Patient Directions
- Dispense Amount
- Number of Refills: Schedule II medications cannot have a refill. Enter zero (0) in that case. Schedule III, IV and V may have five (5) or fewer refills. Non controlled substances may have 99 or fewer refills.
- Days Supply: Cannot exceed 365 days. Schedule II medications require this field and cannot exceed 90 days.
- Check No substitutions if needed.
- If your state requires it, add ICD/ADA code in the Pharmacy Notes. Click "+" above Show Pharmacy Notes to expand.
- Click the star icon to save this medication to favorites.
- Press Save Prescription.
Sending New Medications
- On the Patient Dashboard, scroll down to Pending Medications.
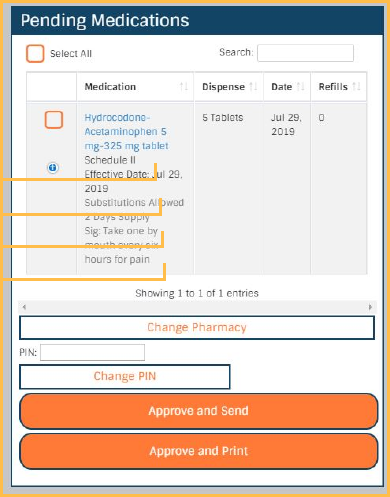
- Check the box next to the medication to select it.
- Enter the provider's PIN.
- Press Approve and Send.
Edit or Delete a Pending Medication: Click the blue "+" button below the checkbox on a pending medication to access the Actions menu. 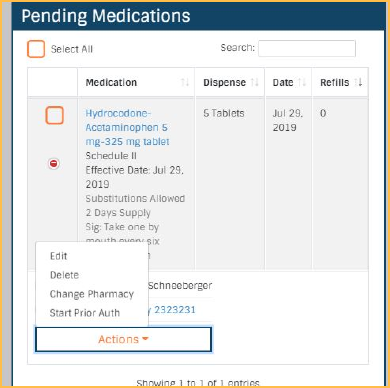
- Edit: Modify Pending prescription.
- Delete: Remove pending medication from the list.
- Change Pharmacy: Modify pharmacy for pending medication.
- Start Prior Auth: Begin a prior authorization for insurance.
Non controlled substances: Prescriptions are sent immediately and the status is indicated with a gray arrow in the Patient's Active Medications. After refreshing the page, the gray arrow will turn into a green check mark.
Controlled substances: The prescribing provider must Register for EPCS before sending. See DoseSpot Setup.
- Confirm the pharmacy and prescription.
- Click Ready to Sign.
- Enter the provider's PIN. If needed, select the link to your states PDMP website. You will need to provide your username and password.
- Open the Duo Mobile app on the provider's mobile device and enter the two-factor authentication (TFA) code.
- Click Approve & Send.
Favorites
Favorites are prescriptions that you have already set up and use commonly that can quickly be prescribed for a patient. Favorites can be edited on a individual basis, but will default to the information included when the prescription was favorited. Favorites can be created on both a Clinic and User level. To create Favorites, see DoseSpot eRx/Prescription.
Prescribing a Favorite
- In the Patient Details dashboard, click Add Prescription.
- Select a drug and dosage amount from the favorites list, or begin typing a drug to narrow down the favorites list.
- Verify the sig is correct and click Save Prescription.
- Send prescription as normal.