Insurance Verification List
The Insurance Verification List is useful for offices that verify Insurance Benefits and patient eligibility prior to appointments.
In the Appointment Lists, click Ins Verify.
![]() See our video: Managing the Insurance Verification List Webinar.
See our video: Managing the Insurance Verification List Webinar.
The Insurance Verification list is managed manually. Use this list to quickly identify when insurance benefits and patient eligibility need verification. Offices can also assign ownership of verifications, and then track, change, and manage verification status. Set defaults for the list in Insurance Verification Setup. The Insurance Verification Security Permission is required for users to access this list.
Verification Filters
Set the criteria to change the results listed. Filters are available from and affect all tabs. Set defaults in Insurance Verification Setup.
- Days until scheduled appointment: Enter the number of days to consider appointments. Only patients with an appointment in this time frame are shown on the Insurance Verification List when other filters are met.
- Plan benefits haven't been verified in: Determines which insurance plans (Ins) list based on the last benefit verification date.
- Days since patient eligibility: Determines which patients (Pat) list based on the last patient eligibility verification date.
- Carrier: Enter a specific carrier name. Leave blank to include all carriers.
- For User: List verifications assigned to a specific user. The dropdown lists all users currently assigned a verification. Click to select, or click [...] to select from a pick list.
- Select All: Updates selection to all All Users. Shows all verifications, including unassigned and those assigned to hidden users.
- Select None: Updates selection to Unassigned. Only shows verifications not assigned to any user.
- Hidden users are not listed in the dropdown or pick list. If verifications are assigned to a hidden user, this is denoted with (hidden) following the user name. These verifications display only when All Users are selected.
- Verify Status: Only list plans and patients with a specific verification status. Customize options in Definitions: Insurance Verification Status.
- Region (only visible when using Clinics and Definitions: Regions have been created): List verifications by clinic region.
- Clinic (only visible when using Clinics): List patients with appointments in a specific clinic. Only clinics accessible by the logged-on user are options.
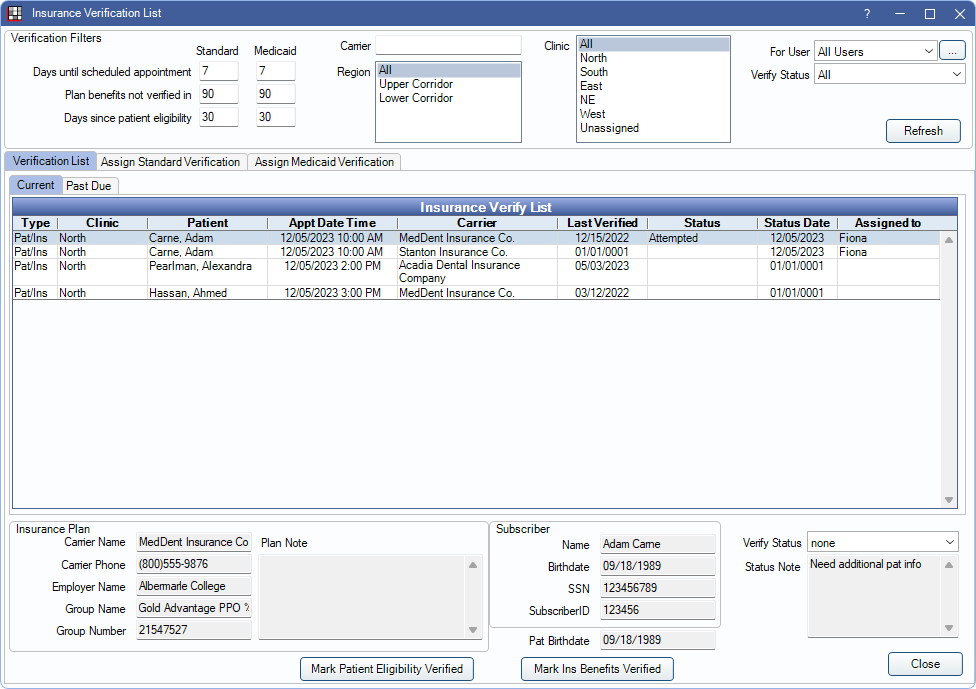
Verification List
The Verification List tab opens when first launching the Insurance Verification List. To preview insurance plan information, subscriber information, and verification status, highlight a patient or plan. The information appears at the bottom. To open the Insurance Plan, double-click a row, or right-click and click Go to Patient Plan.

Verifications are grouped by those that are current and those that are past due. Click a tab to view verifications that meet the Verification Filter criteria.
- Current: Verifications for appointments in the future that meet the filter criteria.
- Past Due: Verifications that meet filter criteria, yet are past due. Typically, this list should only include verifications for yesterday's appointments that need to be done as soon as possible. The number of days that determine past due status is set in Insurance Verification Setup.
Insurance Verify List: Click on a column header to sort the list in ascending or descending order.
- Type: Three different verification types may list
- Pat: Patient eligibility needs verification.
- Ins: Insurance benefits need verification.
- Ins/Pat: Both patient eligibility and insurance benefits need verification.
- Patient: Name of the patient associated with the upcoming appointment.
- There can be many patients on a single plan and multiple patients may need to have their eligibility verified which can result in multiple Pat rows per plan.
- Plan benefits only need to be verified once to affect all patients on that plan. To avoid multiple users trying to verify the same plan at the same time, Open Dental only shows one Ins row per plan (or one Ins/Pat row if at least one patient needs to be verified). If a patient is also linked to the plan verification it is the patient with the closest appointment date and time.
- Appt Date Time: Date and time of the appointment for which insurance needs to be verified.
- Carrier: Insurance carrier associated with the plan.
- Last Verified: Date insurance benefits or patient eligibility was last verified. Date corresponds to the Type listed. If the Type is Pat/Ins, the date shown is the oldest date of last verification for either eligibility or benefits. A date of 01/01/0001 indicates benefits or eligibility have never been verified.
- Status: Verification status assigned to the patient.
- Status Date: Date verification status was set or updated. If no status is assigned, the date a user was assigned is shown or 01/01/0001 is shown if no status or user has been assigned.
- Assigned to: User assigned to verification.
- To change information, the Insurance Plan Edit security permission is required.
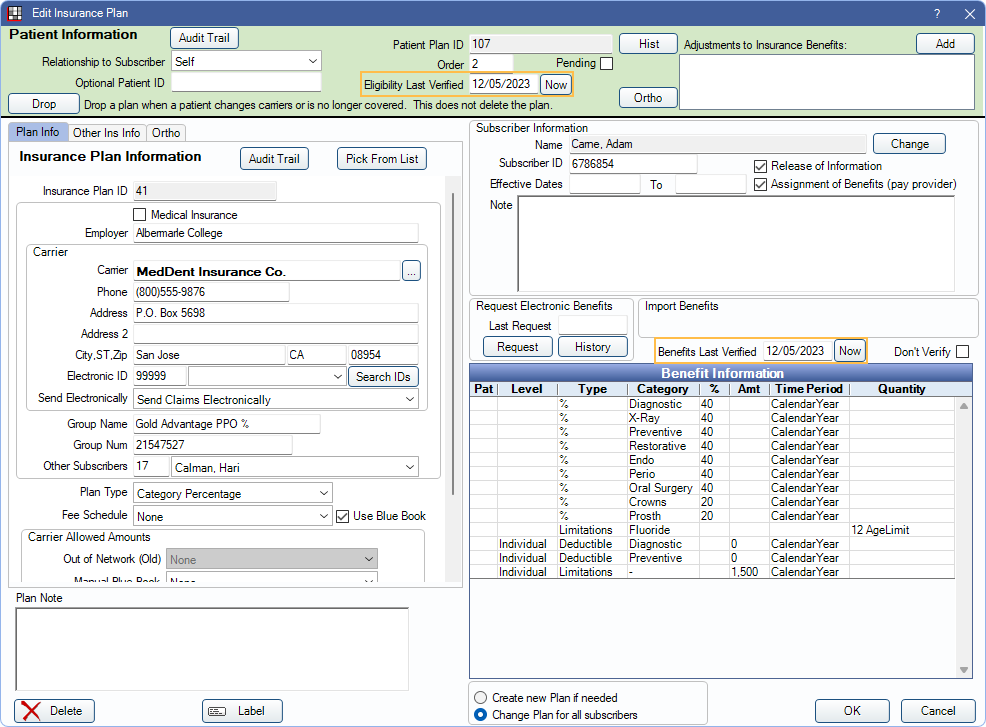
- To exclude a plan from the list, check Don't Verify on the Edit Insurance Plan window.
Right-click Options: From the Verification List tab, right-click on a row for additional options.
- Go to Patient: Open the Family Module for the selected patient.
- Go to Patient Plan: Open Edit Insurance Plan for the selected insurance plan.
- Assign to User: Choose a user to assign insurance verification for selected row.
- Set Verify Status to: Choose a verification status for the selected row. The Add Status Note window opens. Additional details can be entered in the status note.
- Verify Insurance Benefits: Mark insurance benefits verified. Benefits Last Verified date is updated in Edit Insurance Plan window for all patients attached to this insurance plan and verification list is refreshed. Option only appears if type is Ins or Ins/Pat.
- Verify Patient Eligibility: Mark patient eligibility verified. Eligibility Last Verified date is updated in the Edit Insurance Plan window for this patient only. Option only appears if Type is Pat or Ins/Pat.
- Verify Both: Mark insurance benefits and patient eligibility verified. Benefits Last Verified and Eligibility Last Verified dates are updated. Option only appears if Type is Ins/Pat.
Insurance Plan and Subscriber Information

In the Verification List tab, at the bottom, insurance plan and subscriber information are shown for the highlighted plan.
Insurance Plan: Information for the selected insurance plan. Information is not unique to the highlighted patient. Includes information that may be necessary to contact a carrier and verify insurance benefits.
- Click Mark Ins Benefits Verified after verifying benefits to update Benefits Last Verified date.
Subscriber: Information for the subscriber of the selected insurance plan. Also includes birthdate for the selected patient, which may differ from the subscriber. This is information that may be necessary to verify patient eligibility when office staff contacts a carrier.
- Click Mark Patient Eligibility Verified after verifying patient eligibility to update the Eligibility Last Verified date.
Verify Status: Click an Insurance Verification Status from the dropdown to set or update the Status and Status Date. After selecting a status, the Add Status Note window opens. Additional details can be added here.
Status Note: Shows the details of the most current status update.
Assign Standard Verification/Assign Medicaid Verification
Users can be assigned to insurance verification from the two Assign Verification tabs. Column descriptions and filters are the same as the Verification List. Users must have the Insurance Plan Verification List Security Permission to be assigned insurance verification.
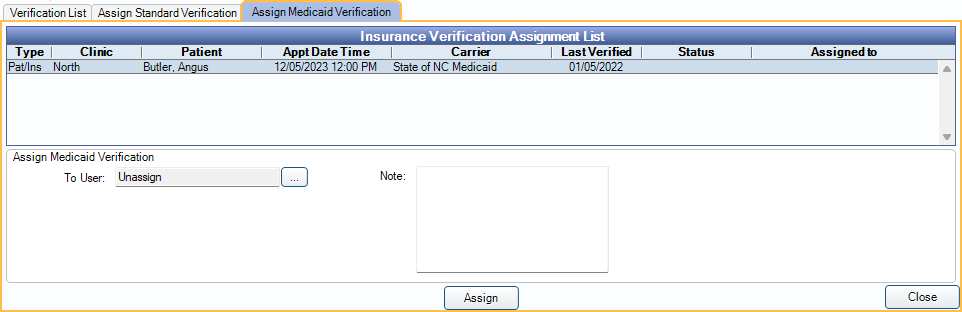
Plans are listed in the Assign Medicaid Verification tab when the Filing code for the plan (set in Edit Insurance Plan, Other Ins Info Tab) is selected in Insurance Verification Setup, Show In Medicaid List When.
Plans with all other insurance filing codes, or no selected insurance filing code, are listed in the Assign Standard Verification tab.
For User filter defaults to Unassigned to show verifications that have not yet been assigned to any user.
Right-click options:
- Assign to User: Select a user to make responsible for verifying insurance.
- To assign multiple verifications to the same user, click and drag, or press Ctrl or Shift while clicking, then right-click and select a user.
- Set Verify Status to: Select an insurance verification status to set or update the Status and Status Date.
Assign Standard Verification / Assign Medicaid Verification: Assign verification to specific users or set a status note from this area.
To User: Assign insurance verification to specific users.
- Select verifications to assign. Click and drag, Ctrl + click, or Shift + click to select multiple.
- Click [...].
- Select a user from the list. Click Select None to unassign verifications instead.

- Click OK.
- Click Assign at the bottom of the Insurance Verification List window.
The selected verifications are now assigned to the selected user (or unassigned if Select None was clicked). If the verification was previously assigned to another user, the verification is now only assigned to the new user.
Note: Enter a status note. When right-clicking and selecting Set Verify Status, any note typed into this box is automatically added to the Add Status Note window.
Mark a Patient Eligibility (Pat) / Insurance Benefits (Ins) as Verified
There are several ways to mark patient eligibility and/or insurance benefits as verified. Marking a verification as verified changes last verified dates on the Edit Insurance Plan window.
Dates are updated according to Insurance Verification Setup preferences:
- Eligibility Last Verified Date:
- Updates to the current date (i.e., today) if the preference Always reverify service year patient eligibility is disabled.
- Updates to the appointment date if the preference Always reverify service year patient eligibility is enabled.
- Benefits Last Verified Date:
- Updates to the current date (i.e., today) if the preference Always reverify service year insurance benefits is disabled.
- Updates to the appointment date if the preference Always reverify service year insurance benefits is enabled.
Option 1:
- On the Verification List tab, right-click on a verification then select an option. Options vary depending on the type of verification selected.
- Verify Patient Eligibility: Mark patient eligibility as verified (Eligibility Last Verified date automatically updates).
- Verify Insurance Plan: Mark insurance benefits as verified (Benefits Last Verified automatically updates).
- Verify Both: Mark both patient eligibility and insurance benefits as verified (automatically updates both dates).
- Click OK on the confirmation message that is displayed.
- The date for the selected patient's eligibility and/or benefits is updated.
Option 2:
- On the Verification List tab, highlight the verification row. General insurance plan and subscriber information are displayed at the bottom of the window.
- Click one of the verified buttons:
- Mark Patient Eligibility Verified: Mark patient eligibility as verified (Eligibility Last Verified date automatically updates).
- Mark Ins Benefits Verified: Mark insurance benefits as verified (Benefits Last Verified automatically updates).
- A confirmation message displays. Click OK to confirm.
Option 3:
- On the Verification List tab, double-click a verification row, or right-click and select Go To Plan to open the Edit Insurance Plan window.
- To verify patient eligibility, manually enter a date for Eligibility Last Verified.
- To verify insurance plan benefits, manually enter a date for Benefits Last Verified.
- Click OK to save.