

eClipboard: Treatment Plan
Saved treatment plans can be sent to eClipboard for patients to review and sign.
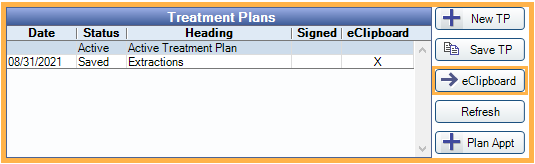
In the Treatment Plan Module, highlight a saved treatment plan. Click the eClipboard button.
Also see:
Patient Currently in Session
If a patient is currently in an eClipboard session, highlight the Saved Treatment Plan then click eClipboard.
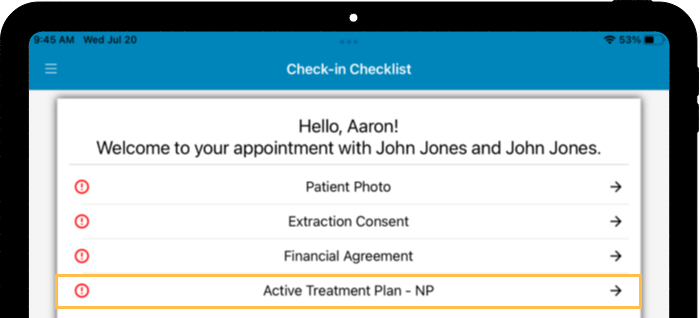
The Treatment Plan will be added to their Check-in checklist.
Patient Not in Session
If the patient is not currently in an eClipboard session, the treatment plan can be sent to the device.
- In the Treatment Plan Module, highlight the Saved Treatment Plan, then click eClipboard.
- The following window will show.
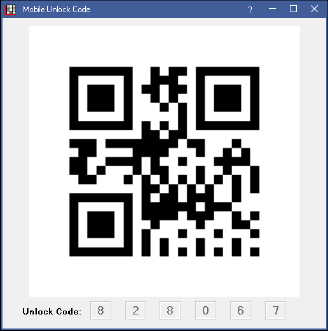
- In eClipoard, click the QR icon.

- Either use the device camera to scan the QR code, or type in the unlock code.
- The treatment plan will populate in eClipboard.

- Click the Full Screen button in the upper-right to zoom in on the treatment plan.
- Additional saved treatment plans can be sent to the device for the patient to compare and review.
- Once a patient has made a decision, click Sign. The signature field will display to sign electronically.
Saving Treatment Plans
Before treatment plans signed via eClipboard can be saved, Microsoft Visual C++ 2015 Redistributable Update 3 must be installed on the server.
Treatment plans signed via eClipboard are automatically saved to the Imaging Module if the preference, Save signed Treatment Plans to PDF, is enabled, and the OpenDentImages folder is using network file storage, Dropbox, or SFTP (cannot be a local folder).
Updating Treatment Plans
Treatment plans can be updated while still loaded to the eClipboard device. Simply make the edits to the saved treatment plan in Open Dental, then click eClipboard. Updates will reflect in eClipboard.
To remove a treatment plan currently loaded to eClipboard, in the patient's Treatment Plan module, click the X next to the saved treatment plan in the Treatment Plans grid.