Print Appointments
The appointment schedule or Routing Slips can be printed for the day as needed.
In the Appointments Module, in the Toolbar, click Print.

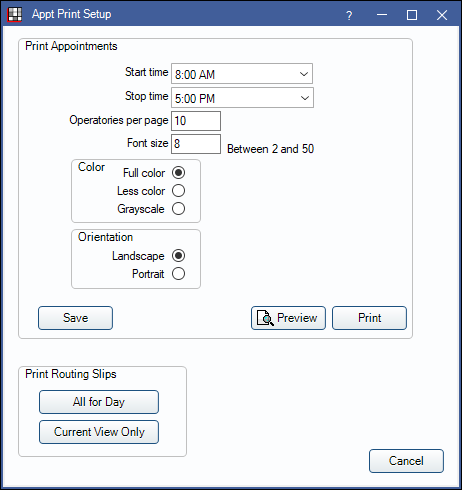
From the Appt Print Setup window, customize the print settings for the appointment schedule or print Routing Slips for the day.
Print Appointments
- Start / Stop Time: Enter the time span to print appointments.
- Operatories per page: Directly affects how many pages are printed and scales the size of the Operatories printed. More Operatories per page results in fewer printed pages. If the Operatories per page exceeds the number of Operatories in the selected Appointment View, the printout includes blank space. Adjust the Operatories per page to match the number of Operatories in the Appointment View to scale the full page.
- Font Size: Affects how many pages are printed.
- Color: Determine how to print the appointments. Useful for saving colored ink.
- Full color: Operatories, Blockouts, and appointments boxes print in solid color as they appear on screen.
- Less color: Operatories with Blockouts with be printed with a crosshatch in the corresponding Blockout color. Closed Operatories print with a crosshatch in the corresponding color. Appointments print in white.
- Grayscale: Printed without color. Operatories with Blockouts show a crosshatch and closed Operatories show a crosshatch going the opposite direction. Appointments print in white.
- Orientation: Determine the orientation to print the schedule.
- Landscape: Print in landscape.
- Portrait: Print in portrait.
- Save: Save settings for the next time the schedule is printed.
- Preview: Review the print output.
- Print: Print the appointment schedule for the day. Prints the currently selected Appointment View.
Note: The current setting for Day or Week view in the Appointments Module determines if a daily or weekly list is printed. Time increments and rows per increment set in Appointment View Setup can affect printing. If too many pages are still printing, increase the time increment or set the rows per increment to one.
Print Routing Slips
Print Routing Slips for appointments on the schedule for the selected day. Not available if Headquarters is the selected Clinic, or if Week view is selected.
- All for Day: Print all Routing Slips for appointments assigned to the selected Clinic on the selected day.
- Current View Only: Print Routing Slips for the selected Appointment View only.
If multiple Routing Slip Layouts exist in Sheets, the top-most option in the custom grid is used. If there are no custom Routing Slip layouts, the internal Routing Sheet is used.

