Progeny Bridge
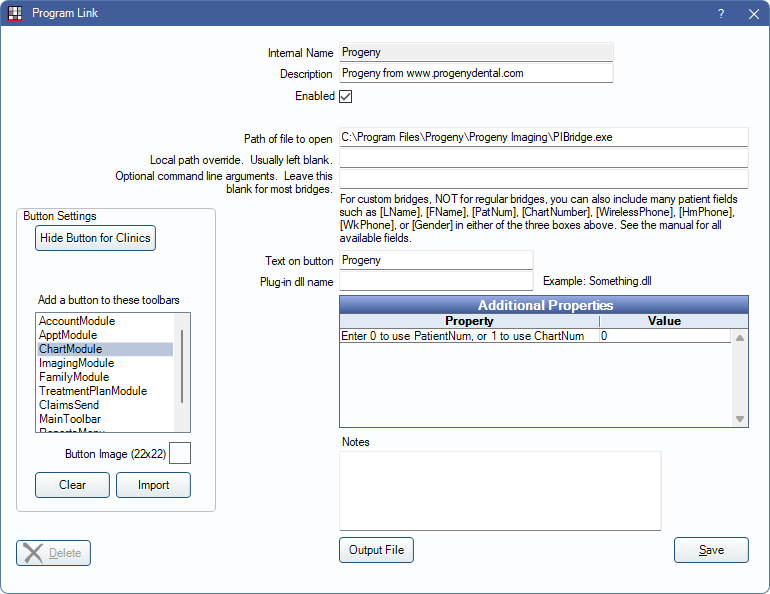
In the Main Menu, click Setup, Program Links. Double-click on Progeny from www.progenydental.com.

Progeny is an imaging software. Website: www.progenydental.com.
To enable the bridge:
- Check the Enabled box.
- Verify the Path of file to open.
- Double-click on Additional Properties to change settings. Use the PatNum (enter 0) or ChartNum (enter 1) as the patient ID.
- Set up a clickable bridge button.
- Under Add a button to these toolbars, highlight where to display the button.
- Enter the Text on button.
- (Optional) Import an image to show on the button (22 x 22 pixels).
- If using clinics, click Hide Button for Clinics. Select which clinics the button should display on.
- Click Save.
Technical Details
The following patient information is sent to Progeny when the bridge button is pressed in Open Dental: first name, last name and identifier (either PatientNum or ChartNum). Patients are loaded in Progeny based on the identifier passed in from Open Dental.
- Date of Birth is required to be entered for patients for bridge to launch.
- Progeny does not receive gender from Open Dental. All new patients are automatically assigned male. This must be changed manually in Progeny as required.
- Progeny accepts two word last names, but combines them into a single word.
Receive an error message in Progeny: No Patient Selected. If you close Progeny, then launch the bridge in Open Dental, this error message may display depending on how long Progeny takes to load. Eventually, the patient does load.
To avoid this message, leave Progeny running in the background.
When I launch the Progeny program link, more than one instance of Progeny is created.
Call Progeny support to get help upgrading Progeny to version 1.10 or later.

