AudaxCeph Bridge
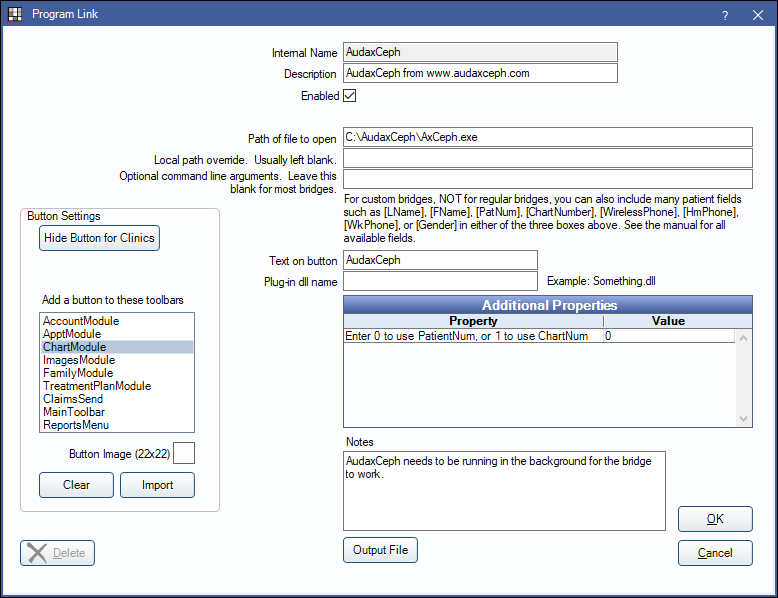
In the Main Menu, click Setup, Program Links. Double-click on AudaxCeph.

AudaxCeph is an x-ray analysis software. Website: http://www.audaxceph.com/.
To enable the bridge:
- Check the Enabled box.
- Double-click on a row in Additional Properties to change settings. Use the PatNum (enter 0) or ChartNum (enter 1) as the patient ID.
- Set up a clickable bridge button.
- Under Add a button to these toolbars, highlight where to display the button.
- Enter the Text on button.
- (Optional) Import an image to show on the button (22 x 22 pixels).
- If using clinics, click Hide Button for Clinics. Select which clinics the button should display on.
- Click Save.
The AudaxCeph bridge must be open to use the bridge button in Open Dental. If a patient is selected in Open Dental, but AudaxCeph is already open with a different patient selected, clicking the bridge button does not change the patient.
Technical Details
Because of the AudaxCeph bridge, the following occurs:
Patient Status: Every patient opened in AudaxCeph has a patient status of active, even if a different patient status (e.g., deceased, inactive) has been selected on the Edit Patient Information window in Open Dental.
Gender: There are four gender selections in Open Dental (male, female, other, unknown) and only two in AudaxCeph (male, female). All unknown or other genders in Open Dental are translated to a male gender in AudaxCeph.
When the bridge is enabled, Open Dental creates an update.xml file in the installation folder which AudaxCeph reads from.

