

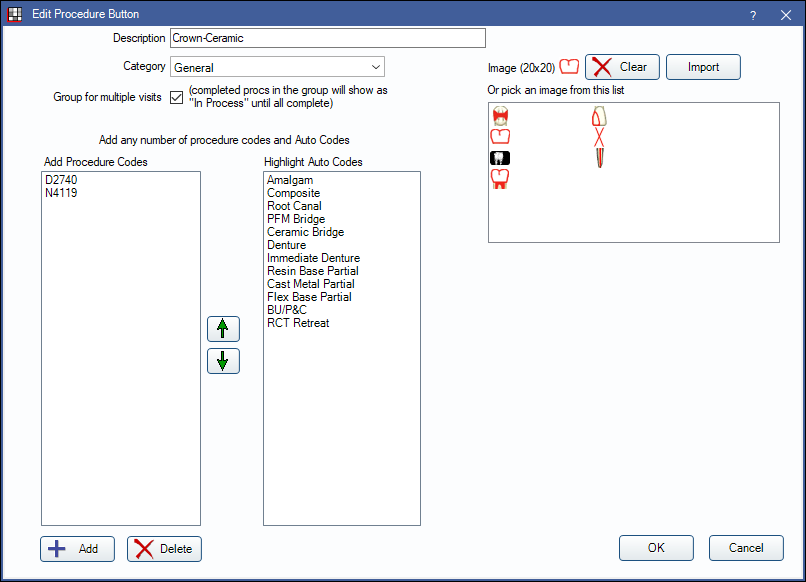
Procedure Button Edit
Set up procedure buttons to quickly chart a group of procedures.
In Procedure Buttons, select a category. Double-click an existing procedure button.
Alternatively, in the Procedure Buttons window, select a category, then click Add to create a new procedure button.
Default procedure buttons are created using Procedure Code Tools. To restore to the defaults, run this tool again.
Enter general button information:
- Description: The button name.
- Category: Click the dropdown to select the button category.
- Image (20x20): Select an image to associate with the button. The current image appears to the right of the field. There are three options:
- Pick an image from the list on the right.
- Click Import to select an image file on your computer. Images must be 20x20 pixels.
- Click Clear to remove the current image.
- Group for multiple visits: Check this box if the procedures on this button should be grouped for multiple visits (e.g., crowns). When procedures are grouped, completed procedures will show as a status of Complete (In Process) until all other procedures in the group are completed as well.
- Add Procedure Codes: Associate procedures with this button.
- Click Add to add a new code from the Procedure Code List.
- Click Delete to remove a code.
- Use the Up and Down arrows to organize procedure codes for easier viewing.
- Highlight Auto Codes: Select auto codes to associate with this button. To select multiple auto codes, press Ctrl and click on the codes to highlight.
Click OK to save the procedure button.
Procedure button logic
When entering treatment, you can select multiple teeth before clicking a procedure button. The program will loop through each tooth and repeat the logic.
For example, set up a bridge procedure button:
- Select one non-ADA code for a bridge seat.
- Set an area type of tooth range.
- Select one auto code for bridge with two alternatives: assign a pontic code for missing teeth, assign a retainer code for other teeth.
In the patient's chart:
- Mark the pontic tooth as an existing extraction as described in Missing Teeth.
- Select all three teeth involved in the bridge and click the bridge procedure button.
Since the bridge seat is a tooth range, the program will know to not add it three times to the chart, but only once with all three tooth numbers selected.
Quadrants
Procedure buttons can be used to create four procedures, each with a different quadrant. To trigger this behavior, enter four of the exact same code to the Add Procedure Codes list (e.g., D4341, D4341, D4341, D4341). To use, click the procedure button with no tooth selected. The codes are charted starting with UR quadrant and ending with LR quadrant (i.e., UR, UL, LL, LR). If there are more than four procedures assigned to the Procedure Button with a Treatment Area of quad, this will cycle through to the start again (i.e., UR) until the last procedure is charted. If different procedure codes are assigned to the Procedure Button, procedures are charted and assigned treatment area in the order they are listed.
There is no support for a procedure button to create a procedure with a specified quadrant. Instead, the quadrant is assigned based on the tooth selected when the button is clicked. If no tooth is selected, single procedure defaults to UR. To trigger this behavior, enter one code to the Add Procedure Codes list (e.g., D4341). To use, select a tooth in one or more quadrants and click the procedure button. The procedure is charted for all selected quadrants (e.g., if teeth 6 and 14 are selected the procedure is charted in quadrants UL and UR).
Quick Buttons can be created for a SRP as well (see Quick Buttons above). Create a quick button with SRP in the title, enter D4341 as the code, leave the Surface field blank and click OK. Then select a tooth in the specific quadrant and click the Quick Button. If a tooth is selected in all four quadrants, a separate SRP procedure is charted for all four quadrants.