

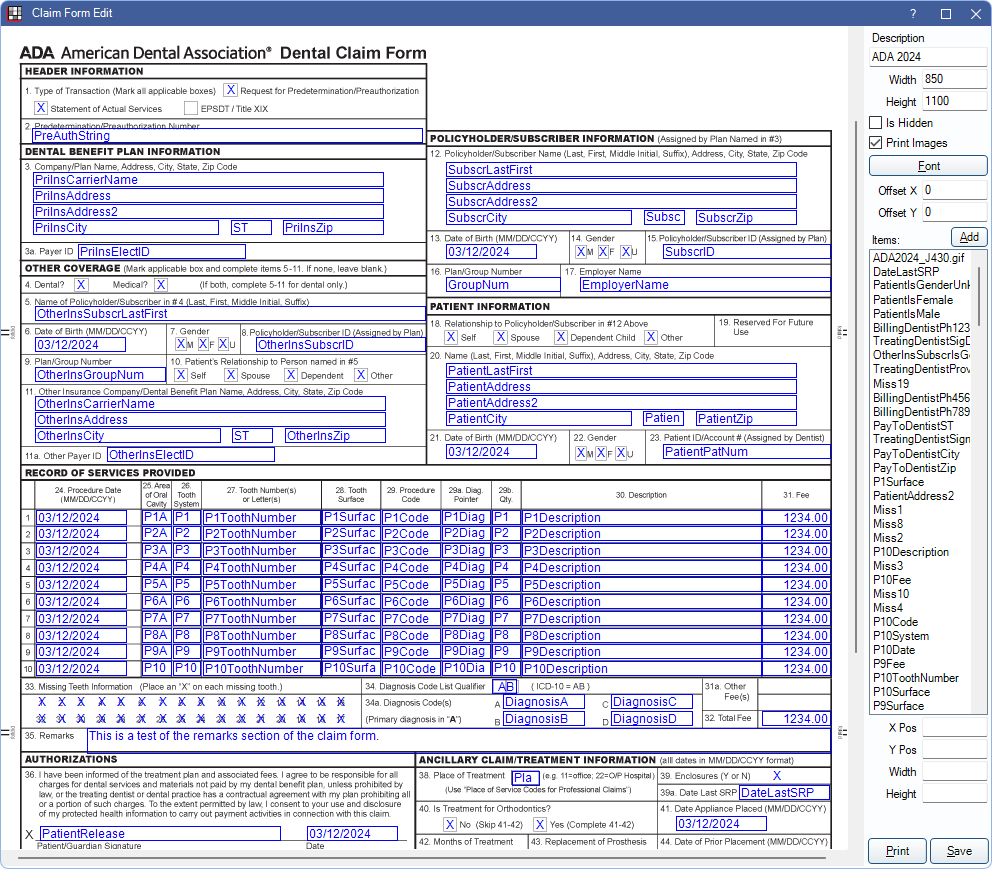
Claim Form Edit
Claim forms can be customized or added as needed.
In the Claim Forms window, double-click a custom claim form.
Changes to claim forms only affect printed claims and do not affect electronic claims. We recommend contacting Open Dental support to make changes, as changes may affect claim submission and payment.
Possible reasons to modify a claim form:
- Change the identifying name of the claim form.
- Remove the claim form as an option in various lists (hide).
- Set whether or not background claim form images print.
- Change the alignment when printing on a preprinted form.
- Modify fields on the claim form (not recommended).
The left side of the window shows the items on the claim form. The right side of the window has an edit panel.
Options
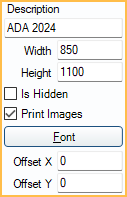
Description: Name of the claim form.
Width / Height: Dimensions of the claim form when printed. Edit width and height when claim form is not printed on standard 8.5 in. x 11 in. paper.
Is Hidden: Hide a claim form so it no longer shows as an option in various drop downs.
Print Images: Set whether or not background images print.
- Checked: Print background claim image.
- Unchecked: Do not print the image (e.g., when printing on a preprinted paper such as Denti-Cal forms).
Offset X / Offset Y: Change the alignment of the form when printing on a preprinted form. Values can be positive or negative and shifts all elements on the page by the given number of pixels in hundredths of an inch.
Items
The Items grid displays fields currently added to the claim form. When an item is highlighted, the corresponding field on the claim form displays in red.
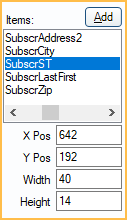
Add: Open the Claim Form Item window to add additional items to the claim form. Alternatively, double-click a field to change it.
X / Y Pos: The X and Y coordinates of the selected field. Can be edited.
Width / Height: The width and height of the selected field. Can be edited.
Edit Claim Form Item
Click Add to create a new Claim Form Item or double-click an existing Claim Form Item on the claim form to edit.
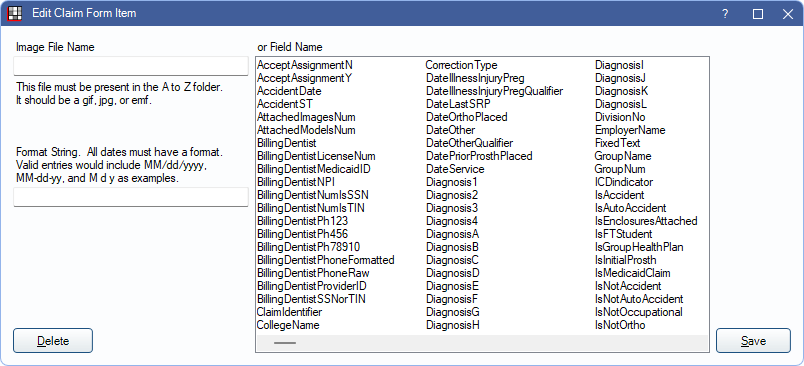
Image File Name: When a background image is selected or being added, enter the file name here. The file must exist in the OpenDentImages Folder. When an image is entered here, no fields should be selected on the right.
Format String: When adding a field that includes a date, enter the date format here.
Field Name: If not using an Image File Name, select the field to be used on the claim form.
Click Save to keep changes.
Add a New Claim Form
If adding a new claim form from scratch (i.e., not importing XML), do the following in order.
- Prepare a high resolution background image. Image must be GIF, JPEG, or EMF.
- Save the background image to the OpenDentImages folder.
- In the Claim Forms window, click Add to open the edit window.
- Add the background image. Click Add then enter the image file name in the Edit Claim Form Item window. Adjust the X and Y positions as needed.
- Click Add to add fields. When a field is added, move it to the appropriate location on the claim form.
- Move items by clicking and dragging or by using the arrow keys.
- To make the movement larger press Shift while pressing an arrow key.
- To select groups of items to move as a unit, press Ctrl while clicking. When groups are selected, any change made in the X/Y Pos or Width/Height boxes apply to all items in the group.
- Click Save to keep changes and add the form.
Hints:
- The dollar amount fields are right justified, so the X position functions differently (for now, click to the right of an amount field to highlight it).
- Be careful not to accidentally drag when highlighting items, especially groups.
- Set the width or height to zero to get rid of the surrounding rectangle and to not restrict the area of printing.
- The screen may flicker when dragging fields.