

Topaz BSB Model Setup
This is the basic setup process of the Topaz T-S460-BSB-R for use with Electronic Signatures. May apply to other models that are meant to work with Remote Desktop Connection (RDC). Unlike the Topaz HSB models, this BSB model works with Microsoft's Remote Desktop Services and RemoteApp with the Terminal Services role turned on (i.e., more than one remote client session on the same server). Terminal Services Users must use this model instead of the HSB models.
Topaz BSB model digital signature pads only work with Open Dental version 15.3 or greater.
To get started setting up a Topaz BSB signature pad for use on a Terminal Server:
- Open the Topaz Setup Instructions (PDF).
- You will likely be following the instructions for terminal server. If so, skip step three.
- Complete the steps laid out in the PDF.
See Server Setup and Workstation Setup below.
Server Setup
Set up the server once, then follow the workstation setup steps for each workstation. The steps below are required.
Log into the server, then download and save SigPlus.exe.
If using Server 2003
- Open Add/Remove Programs, click Add New Programs.
- Click Browse, and navigate to the SigPlus.exe.
- Run the install through the Add/Remove Programs wizard.
- Choose your tablet model during install and the COM1 connection type.
If using Server 2008/2012. Remote Desktop Session Host Configuration must be installed for this to work. See checking port settings below.
- From a CMD line, type Change user/install to enter Install mode.
- Install SigPlus.exe. Choose your tablet model during install and the COM1 connection type.
- After installation, from CMD line, type Change user/execute or restart server to place server back into Execute mode before using the application.
Create a SigPlusRoot.ini file and change the TabletComPort.
- Copy SigPlus.ini from C:\Windows and paste it into the root directory (e.g. C:\).
- Rename it SigPlusRoot.ini.
- Change the TabletComPort assignment to the desired COM port (see step 7 in Part 1 below).
Workstation Setup
Below are the steps for Terminal Servers from the manual (08/20/2015).
Part 1: Client Side Installation
- Download and save the SigPlus BSB Pad Installer (.exe) to your local client computer/terminal.
- Right-click the sigplusbsb.exe and choose Run as Administrator.
- Follow the installer, choosing the appropriate tablet model.
- Click Start, right-click Computer, click Properties.
- Click Device Manager from the menu on the left.
- Click the white arrow to expand the Ports section and locate the USB Serial Port.
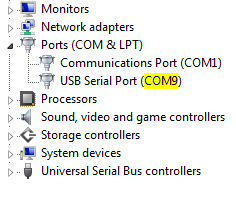
- Note what COM port was assigned to this device. In this example, the port is COM9.
Part 2: Setting up Remote Desktop for Serial Port Redirection
- Click Start, All Programs, Accessories, Remote Desktop Connection.
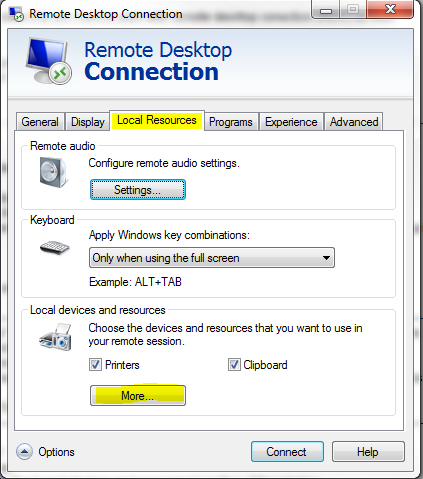
- The Remote Desktop Connection opens. Click Options in the corner.
- Click the Local Resources tab at the top of the window. Click More in the Local Devices and Resources section of the window.
- Click Ports to check the box.
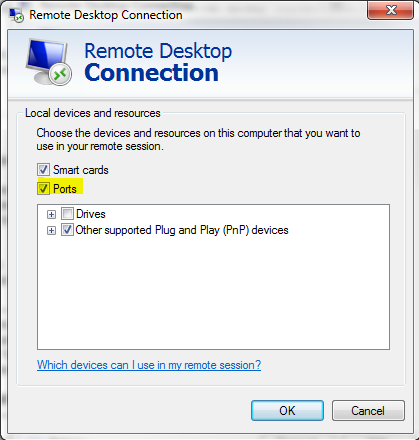
- Click OK. Ports needs to be checked when you log into a session for the signature pad to work in that session.
Part 3: Setting Up Signature Capture for Each User
- Log into the server via an RDC session, and download and save the winloc.exe utility: www.topazsystems.com/Software/winloc.exe
- Double-click the winloc.exe to run.
- Click on WINDOWS from the list and note the Path reported.
- Copy the SigPlus.ini file from C:\\Windows and paste it into the path reported by winloc.exe.
- Double-click this new SigPlus.ini file to open.
- Change the TabletComPort assignment to the COM port you noted from step 5 on page 6.
- Once done, click File, Save.
- You will need to repeat this process for each user that has a signature pad. Be sure to log in as the particular user you wish to set up each time.
Part 4: Test Your BSB Signature Pad
Before testing your application, you should test with DemoOCX.exe. This can be found in C:\Windows\SigPlus on the server. Open DemoOCX.exe, click Start, and sign on your pad. You should see your writing in the demo window.
Installation Files
Client Side
http://www.topazsystems.com/software/sigplusbsb.exe (run as Admin)
Host Side (through RDC)
http://www.topazsystems.com/software/sigplus.exe (run as Admin)
Notes/Things to Check
- If previous version of SigPlus is installed it is easier to just uninstall and start fresh the first time.
- Make sure you enable ports in the RDC options. To check, follow the steps below for Checking Port Settings.
- You may need to double check that ports are allowed on RDC sessions. To check, follow the steps below for Checking Port Settings.
- Make sure the SigPlus.ini files is in C:\\Windows\
- Make sure to edit the SigPlus.ini file and put in the correct port number.
Checking Port Settings
Client Side
- Open RDC.
- Click Options, Local Resources tab, More.
- Make sure Ports is checked.
Host Side (through RDC)
- Click Start, type Remote Desktop Session Host Configuration into search, click to open.
- Right-click the RDP-TCP Connection and go to its properties.

- Click Client Settings.
- Make sure COM Port is not checked.
Questions and Answers
Topaz signature pad is not writing properly after setup.
Sometimes the test application locks the signature pad. Unplug then re-plug the topaz signature pad to fix the issue.
Unable to sign using a Topaz signature pad when running Open Dental as an administrator.
Do not run Open Dental as an administrator.