Quick Procedure Button
Create Quick Procedure Buttons to quickly chart a procedure attached to tooth surfaces.
In Procedure Buttons, double-click a quick button.

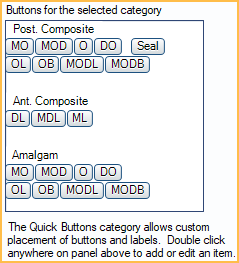
Alternatively, to add a new button, double-click on the white space of an availble row (see screenshot below).
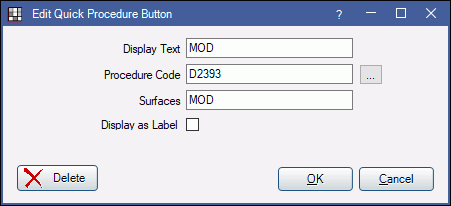
Enter the button information.
- Display Text: The button text.
- Procedure Code: Enter the procedure code that will be applied when this button is clicked. Click [...] to select from the Procedure Codes. Only one code can be associated per quick button and it must exist in the prior to setting up the quick button.
- Surfaces: Enter the surfaces that will be applied when the button is clicked (B/F, V, M, O/I, D/L).
- Display as Label: Check this box to display the text as a label instead of a button. This text will not be click-able in the Chart Module.
Click OK to save. Click Delete the remove the button entirely.
In the Procedure Buttons window, when the Quick Buttons category is selected, the following will display.

Hints:
- Layout: New buttons are always placed to the right of the last button in the row. To add a space between buttons, create a blank button with no text, code, or surfaces, and check Display as Label.
- Surfaces: Any text can be entered for the surface, but Open Dental will validate the surface before applying to the procedure. For example, if a surface of MOPDL is entered, Open Dental will validate it to MODL. Validation will occur left to right and exclude any non-valid surfaces.

