

EHR Lab Order RAD codes
Lab orders for RAD codes (radiology orders) can be manually entered using the lab order interface and imaging results can be attached. This is an older method of entering CPOE radiology orders, but still valid. To be considered a radiology order the Service Identifier (LOINC Codes) must have a class type of RAD. For an order to count as CPOE, a provider must be logged on when the order is created.
- From the EHR Dashboard, click Edit labs.

Only orders entered after December 31, 2013 show. To view prior orders, click Labs/Rads on the EHR dashboard.
- Click Add.
- Enter required order information.
Ordering Provider: Identifier, ID, Identifier Type, Universal ID.
Click [...] to select a provider and auto-populate provider information. If the provider has an NPI, the default Identifier will be the NPI number. If the provider does not have an NPI, the Provider Number (OID) is the default. Identifier must be the NPI or Provider Number.
Service Identifier: Code System, Observation ID and Date/Time Start.
Click [...]to select the LOINC code for this order. The code must have a classtype of RAD. For example, bitewings use the code 46386-9. Date/Time Start must be entered using this format: YYYY-MM-DD.
Or, some dental related LOINC codes that might be useful include:
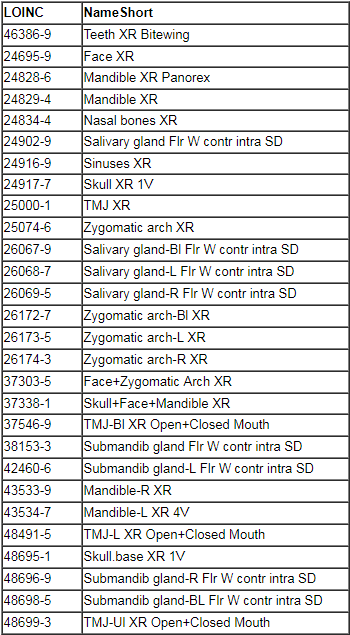
To determine which other codes are RAD, you can use this Query:
SELECT * FROM loinc WHERE classtype="RAD";
- Enter other information if desired (optional).
- Place Order Number: Object Identifiers (OIDs) must be set up. To auto-create order numbers, check the Auto box. When you click Save, the ID, Identifier, and Universal ID fields will populate. The Place Order ID number should exactly match the identifying number on the lab order being sent to the lab.
- Last Update: This date reflects the last time results changed and affects the date of the order on the Lab Orders window. It is not updated automatically.
- All Dates: Must be entered using this format: YYYY-MM-DD
- TQ1 Dates: TQ1 equals Timing and Quantity.
- Notes: Notes about the lab. You can create new notes, or add comments to existing notes.
- Click Save to close the window. The denominator and numerator for CPOE_RadiologyOrdersOnly should increase by one. Measure details are visible in Stage 2 measure reports.
- To track the imaging results, you have two options:
- If you will send the order off and wait for results, reopen the order, click Manage Images, then check the Waiting for Images checkbox.
- If/when the images are ready, reopen the order, click Manage Images, then attach them to the order. See Imaging Results.
Troubleshooting
The dates of orders on the Lab Orders window are all 01/01/0001.
This date matches the Last Update date entered on the Lab Order Edit window. Change it as needed.