

Web Sched Notify Setup
When a patient successfully books a Web Sched appointment online, an optional automated message can be sent via text, email, or both to notify them about the appointment details.
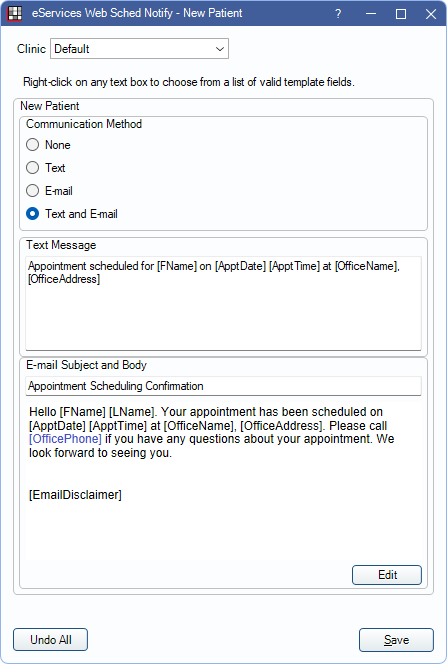
In Web Sched New Patient, click Notification Settings.
Alternatively,
- in Web Sched Existing Patient, click Notification Settings.
- in Web Sched Recall, click Notification Settings.
- in the ASAP List click Notification Settings.
Notify messages can be turned on by clinic and by service. To exclude Web Sched Recall messages from being sent on certain days, see Exclusion Days.
The Notification Settings window is similar for each Web Sched feature. The heading of the window displays which Web Sched feature Notify is being set up for.
Clinic: When there are multiple clinics, create default messages for all or some clinics, or customize messages per clinic.
- To set defaults for multiple clinics, select Defaults, then change the settings.
- To customize the settings for a specific clinic, select the clinic, uncheck Use Defaults, then change the settings.
- To apply default settings to a clinic, select the clinic, then check Use Defaults.
Communication Method: For each service, select the method of sending the notify messages.
- None: Do not send notify messages for the service.
- Text: Only send notify messages via text.
- Email: Only send notify messages via email.
- Text and Email: Send both email and text notify messages.
Text Message: Customize the message sent via text. Right-click in the text box to insert a Message Replacement Fields that dynamically inserts patient data into the message text. The default message varies by Web Sched feature.
Email Subject and Body: Customize the email subject line and body text. The default email message varies by Web Sched Feature.
- Edit: See HTML Email for details on editing HTML elements.
Undo All: Undo all changes made since the window was last opened.
Message Replacement Fields
Both email and text messages can include Message Replacement Fields that dynamically insert patient data from the database. The fields available for each service vary.
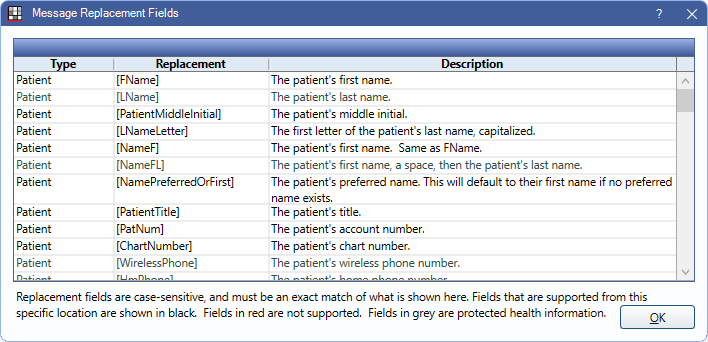
For text messages, place the cursor where a Message Replacement Field should be added, then right-click and select Insert Fields to open the list. Double-click a field to insert it into the message.
For emails, fields must be entered manually. Fields are case sensitive and must match the field in the list exactly.