QuickBooks
Open Dental has the ability to automatically create accounting transactions for deposits in the QuickBooks accounting software.
In Accounting, click Setup, QuickBooks.

The bridge was designed using QuickBooks 2012 and may not work with other versions. To use the Online version instead, see QuickBooks Online.
Enable and Use Quickbooks
- Install QuickBooks on the local computer. Provide access to the company file and log in as an administrator user. Let QuickBooks run in the background.
- Install QuickBooks Foundation Class: Download QBFC10_0Installer.zip, unzip, and run the installer.
- In Preferences, set the Deposit Software to Quickbooks.
- Complete Quickbooks Setup below.
- Generate a Deposit Slip to send to Quickbooks.
Setup Quickbooks
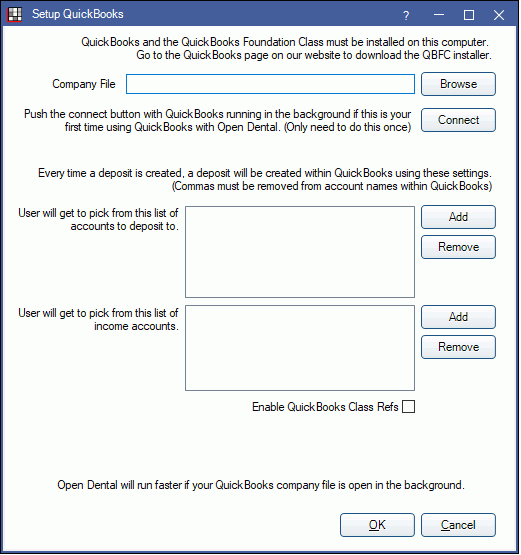
Company File: Enter the path to the QuickBooks company file. To Browse for the company file, close QuickBooks in the background first. Once added, run QuickBooks in the background again.
Connect: Only needs done once. Click to connect with Quickbooks. Opens a security window from QuickBooks. From the security window, select Yes, always, then click Continue.
List of accounts to deposit to: Click Add and select the deposit account to add it to the pick list. Accounts entered here will be options when sending a deposit to QuickBooks on the Edit Deposit Slip window. To remove an account, highlight it then click Remove.
List of income accounts: Click Add to select the Income Account options available when the deposit transaction is created. To remove an account, highlight it then click Remove.
- At least one account in both List of accounts to deposit to and List of income accounts must be added.
- If the account needed is not available when adding, make sure the user is logged into QuickBooks as a user who has access to all accounts.
- Some QuickBooks account types may not allow deposits. Ensure the selected accounts allow deposits.
Enable QuickBooks Class Refs: This preference is useful for those who want to track deposits by clinic in QuickBooks (Class Refs).
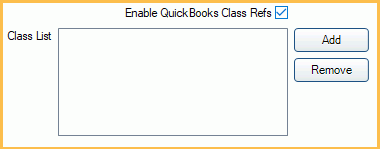
- Checked: Enable the ability to assign class refs to deposits. A Class List area will show listing the class options that will be available when sending a deposit to QuickBooks.

- Add: Click to add a class ref.
- Remove: Highlight a class ref, then click to remove it.
- Unchecked: (old behavior) There will be no Class selection option on the Edit Deposit window.
Click OK to save the settings. The next time a deposit is created in Open Dental, a deposit transaction will automatically be created within the QuickBooks company file, using the accounts chosen at the time of creation.
Technical Details
Multiple Open Dental Databases: One QuickBooks company file can have multiple Open Dental databases making deposits into it. Each Open Dental database will need to have the settings manually set up in order to start making deposits into the company file. Be sure to make a detailed memo if users need to know which database the deposit came from.
Running QuickBooks in Background: Open Dental will run much faster if QuickBooks is open in the background. Make sure to use the exact same company file path to launch QuickBooks outside of Open Dental otherwise users will receive an error that says "Error: A QuickBooks company data file is already open and it is different from the one requested or there are multiple company files open". Having QuickBooks running in the background significantly cuts down on authentication and communication time for every command that Open Dental sends.
Edit Application Permissions in QuickBooks:
- Open the company file. Go to the Edit menu, choose Preferences, and click Integrated Applications.
- Click the Company preferences tab.
- Set the following preferences:
- Uncheck 'Don't allow any applications to access this company file'.
- Uncheck 'Notify the user before running any applications whose certificate has expired'. Note: If checked, automatic access will be suspended when the application's certificate expires.
- Select the appropriate application and click Properties.
- Change any of the options.
- If the company file has multiple users and 'Allow this application to login automatically' is checked, select a user for the application to log in as. Although you can permit the application to log in as any user you want, you may want to create a user specifically for the application. This lets you control the type of data the application can access.
- If necessary, using whatever mechanism is available in the third-party application, set it to communicate with QuickBooks at your chosen time.

